Using Color Backdrops When Photographing Models to Create Erotic or Adult Clip Art
You can easily create adult oriented nude model clip art with just a little planning. Same effects can be used for creating adult xxx clip art.
These photos will illustrate how to begin with photos that can be taken to photo editing software for creating many adult themed photos and clip art. One good photo editing software that is free can be downloaded from GIMP. I will give instructions here. But the sky is the limit on how creative you can be. There are video tutorials online posted to help you understand how to create good erotic photos and clip art using GIMP.
Using a certain color for the backdrop can allow you to later remove that color leaving only the subject that can be pasted into different photos for creating adult theme photos.
Here the model is in front of a red backdrop. Since she is wearing clothing with the color red, might be a poor choice in this instance. If we used photo-editing software to remove that color it will also remove part of what she is wearing. Blue would be a better choice as you can see here.
If we use photo-editing software to remove the blue part will will be left with just the girl for our clip art.
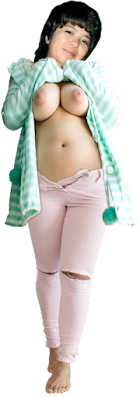
As you can now see, just the girl with a transparent background. If you are using GIMP, before you remove the blue, you can go to the menu at the top and click "Layer". When that dialog box opens go down to "Transparency". When your cursor floats there it will open the side menu and in there click "Add Alpha Channel". Now anything you remove will be transparent. Removing the blue leaves just the girl as you see above. Watch video tutorials many have posted online as there could be many ways to do this depending on what you might desire to have as the end result.

With the background transparent you can copy and paste that photo into any other photo to create the effect of being in that location. You can resize any photo, the clip art or the background, to create a more realistic looking photo. Be advised that if you hide the feet, as I did here, no shadow is required depending on lighting in the background. If you post where the feet are showing, you need to learn to add a drop shadow. This can be done with any photo editing software. Find a good tutorial and practice on photos. A bright photo with no shadow will look fake, like so many we see already on the Internet.
This photo may look like the previous, but using the Consolve tool or Blurring/Sharpen Tool" you can slightly (or radically depending on settings) blend the edges to the background for a more realistic effect.
Here the girl has been darkened to give a more realistic effect with the sunset background we are using. If you learn to break your work into layers, you can jump from layer to layer resampling colors, saturation of colors or brightness to improve the end photo. Find video tutorials that show you how to use layers which is highly recommended.

Here I increased the brightness of the sunset using one of the filters features on GIMP. I went to "Filters" and opened the menu. I went down to "Light and Shadow" and click "Supernova". When it opens it will be blue in the default color. I used the mouse to move it to the center of the sun setting in the background. I then made sure the size was not too big by increasing or reducing the size of the sun. Before I did that I changed the color from blue to white that was slightly yellow. If you merge your pasted photo before doing this, in our example here it's the girl, you find the glare effect also goes across the girl making it look even more like she's really standing in that location. In this case I created a new photo by first selecting "Edit" then "Copy Visible". This will copy whichever layers you have that are visible. I then click "File" then "New" and it will open a dialog box that by default is the same size as your original. Once that opens, hit "Ctrl" and "V" to paste what you copied onto the new photo. You can also go to "Edit" and then click "Paste" to do the same thing. This way the girl, or whatever is pasted, is already in the photo and subject to blending in with the Supernova effect. I modified the color of the Supernova effect, and size, but be advised by default it has the number of rays at 100. I reduced the number of rays to 15 then began increasing and reducing the size to get the perfect visual effect. You may have to recenter the supernova when you resize if you gets away from the center.

In this photo pasted our girl into a photo that has a sunset directly behind her. Seems OK, but can be improved a lot.
Blended the edges to reduce the sharp edges from the girl being pasted. Might be unnecessary depending on whether the clip art is sharp or blurred. Some blur the entire finished product for some effects. The world's the limit on this sort of creativity.
Here I darkened the pasted photo for a more realistic effect with the bright sunset back ground.
Now adding the "Supernova" effect improves the effect making it appear the glare of the sunset is peaking over the girl's shoulder. You can create any effect to match photos you see where different sunsets blend across photos. In this case I used white as the color for the supernova effect.
Pasting into another photo such as a night photo of a street at night
In this photo I used the Supernova filter to brighten the street lamp in this photo prior to adding my clip art.
Here I added the girl. I did darken her to improve the effect with the bright street lamp in the background.
Blended the edges and we're done. Looks like she's right in the photo.
Here pasted into a photo with a green color "Walk" lamp illuminating the photo.
Here only pasted her into the photo.
Blended the edges. Nice, but could be better depending on tastes.
Here I darkened her to improve the realistic effect from the bright back lighting.
Now add green lighting from the "Walk" sign to improve the effect. Here I went to "Filters" then to "Light and Shadow" and selected "Gradient Flare". This is a more complex effect. You can manipulate color, direction of flare and size. You'll have to practice.
Hope you enjoyed this and found it helpful. Good luck!


Comments
Post a Comment